Preventive actions for the assembly of a computer
Before we start, we need some tools for safety and prevention, such as: antistatic bracelets, gloves, cross or plane screwdrivers, thermal paste and some zip ties.
You have to start with all prevention measures to avoid static discharges and damage to the motherboard.
Screwdrivers |  |
Antistatic bracelets |  |
Antistatic gloves |  |
Thermal paste |  |
Zip ties |  |
Sequence of steps performed for the assembly of a computer
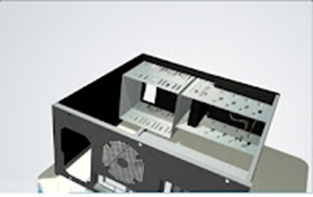
• Now we are going to install the power source, for that we must place it in its place and bolt it well so that it stays this way.

• Now we are going to place the CPU in the socket, for that we must identify in which position it fits and then secure it with its insurance.

• The CPU should be like this:

• Once we finish placing the CPU, we add a little thermal paste on top, the thermal paste helps us so that the CPU does not get too hot, then we place the COOLER on top to help maintain the proper temperature of our processor.

• Don't forget that the cooler needs to be secured by its 4 ends and plug the cable into the CPU FAN.

• Now we are going to place the RAM memory, do not forget that you have to know what type of slot your memory has and the amount of BUS needed, otherwise your computer will not work. Then, depending on the slot, we place the memory in the expansion port, insert it, and finally, we must secure it with the hooks at the ends.


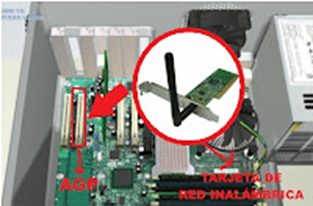
• Once we have installed the mainboard, if we want to, we will place expansion cards (video, network, WLAN). First, we start with the video card, in this case it goes in the AGP port.

• Now we are going to place the network card, in some cases depending on the type of card I can go in the PCI port, in the AMR port.

• Once we place the network card, we will place the WLAN card (wireless network). The antenna is placed next.
• Now that we have finished installing the cards, we are going to install our internal drives (Hard Disk, Floppy Drive, etc.). First, we position the hard disk in such a way that it fits in the 3.5 drive bay, we align it with the holes on the chassis so you can bolt it down.

• Once we placed the hard drive, we went on to place the DVD drive on the outside of the case, in the front drive compartment.

• We place the floppy drive in the same way, except that it will go in the lower compartment.

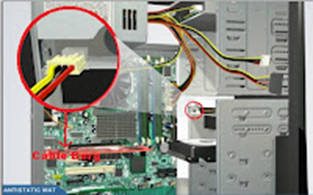
• Now we will connect all the cables from the source to the mainboard. First we put the Cable p1 in the ATX.

• Then place the 12V cable in the ATX 12V connector.

• Now we are going to place the power cables in the different units, first we start with the DVD reader, we place the Molex cable in the correct part of the Reader.

• We now place the Berg cable in the floppy drive.
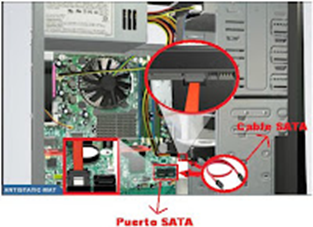
• In our case, our hard drive has a SATA input, so we put the SATA cable to our hard drive, if it is not SATA, we put another Molex cable.

• Now we will place the data cables (PATA, SATA, FLOPPY Cable). First, we start with the PATA cable, we put it correctly in the IDE port.
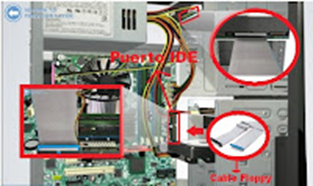
• In the same way we are going to place the Floppy cable in the floppy port, keeping in mind that Pin 1 is the one that commands, then we will place the other end in the floppy drive.

• Finally, we place our SATA cable in the SATA port of the mainboard, we make sure that it is well connected, then we connect the other end to the hard drive.
• Once we finish connecting everything correctly, we proceed to close the case with the covers that we had previously removed, not forgetting that it has to be bolted to make it more fixed.

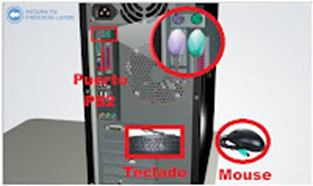
• Now we begin to place some input peripherals (mouse and keyboard in this case). Do not forget that they must place the cables according to the slot they indicate.
• Now we place our video cable, in my case it is a DVI cable, normally most computers use the VGA port.

• If we had a device with a USB input type, then we proceed to connect it to any of the USB ports.

• Now we will place our Ethernet cable, which allows us to connect to a Network

• Now we place the Wireless Antenna in the wireless port.

• To finish, we put our power cable in the back of the Power Supply.

• As a final step we turn on our machine and it should be operational.

*Focus: This type of assembly is in general, on some occasions the model or types of parts may vary in how it is assembled but the procedure remains the same.
No comments:
Post a Comment